Monday, May 27, 2019

Napkin Beach Card - 2019

Marathon Card 2019

I think using napkins for you cards is an old school technique, but it works pretty well. I watch several You Tube videos and decided I liked the plastic wrap ironing technique the best because you
can save most of the image without having to cut off the bumpy embossed edges. I also didn't like how messy I got when using a glue stick. 
One of the YT said the reason to use napkins, is the low cost to get some cool backgrounds. Never really thought of it that way but it makes sense. I went to a Tuesday Morning store this weekend and they had a whole aisle of napkins.  For around $2.00 you can get 15-20 napkins. I was told don't get the napkins at the dollar stores, as they don't hold up very well when transferring and peeling the layers apart. 
I went a little crazy buying up the images I liked buy the TM store isn't close so I knew I would be awhile before I went back again. Yes, ironing a napkin on to cardstock takes time but the end result is well worth the savings. 
Stamp is from Impression Obsession B19157
The little gold star came from my stash = know idea where it came from, I've had it that long. 
Used Copic markers to make the wood looking sign
Black embossing power
Foam tape for the office supply store. 
Thursday, May 23, 2019

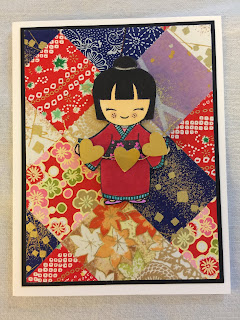
One of my go to cards. 2019

Hero Art Stamp 
This will be one of the cards we'll be making at the marathon next month. It's one I've done before but it's so fun to make! Most people don't have the stash of washi paper I have so it's fun they get to play with a nice variety of paper. 
It's also a good way to use up any washi paper scraps you may have.

I used full sheets of label paper (can get at any office supply store) to hold the washi squares. This was a trick I learned from Michael Strong years ago. 
Stamp - Hero Arts
Washi Paper - Hanko

One of my go to meals.

Finding recipes that fit the lifestyle of a single person is not easy. At last year's family Christmas party a cousin made these chicken wings. It's a very basic recipe and works well for me. A co-worker hates the idea of eating "chicken elbows" but then I don't think she cooks very much. :) 

Toss the chicken in olive oil and then season with salt and pepper. Don't use cheap table salt (I found that out the hard way) even finishing salt works better. Go a little heavy on the seasoning. Heat oven to 425 and bake for an hour. I like my chicken crispy so that's why I cook it for so long. 
Really a very simple dish and easy to reheat. 

Wednesday, May 22, 2019

Last Minute Card - 2019

I had to come up with a fourth card for my workshop at FabMo last week. My creative mojo just wasn't coming up with anything! At 11:00 pm the night before class, I saw something on Pinterest that inspired this card. The great thing about the card was I could use up my huge stash of water color backgrounds. I make backgrounds when I'm in a creative slump so I always have a stash. Slapping color down on paper always helps gets things going. 
As a bonus, the cut out part was made into a second card which will be going to my friend Susan's card rack at her church. 
The die is from Penny Black, Twinkling H2O watercolor and an old SU stamp set, Love and Sympathy

Wednesday, May 15, 2019

Piggy Card 2019

I know non card making people think we can just sit down and whip out cards without really thinking about it. This piggy card went through several drafts before I finally got to a card I'm willing to give to my card making buddies. It took about a month to do. 
I found some cross stitch fabric (not really fabric but very stiff paper) at FabMo and really wanted to make a card. FabMo also gets a ton of thread donated, so I now have a very nice supply. 
The parts you can't see is what took the most time and only other card makers will understand that. I would love to teach this in a class but the stitch part, even as simple as it is takes about an hour to do. 

Monday, May 13, 2019

Paper Crafter - Clean Up

You know your a serious paper crafter when it takes 4 hours (still not 100% done) to sort out all you paper. I was trying to get all my white (110 & 80 lb) card stock back in the same pile along with my black card stock. Those are the colors I use most on my cards. I had several class kits from workshops I've taught that I had to put away, so that added to the sorting. I also found a box of card fronts I started and filed away. When designing for a class, I make samples and if I think I can't teach it in the time frame I have, I file it away.
 I decided last night to put some of them together and send off to a friend who has a card rack at her church which helps supports one of the programs there.